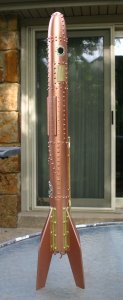
 When I received the March/April issue of Sport Rocketry I noticed the headline on the cover, “Steampunk Rocketry Designs and Techniques”. That sounded interesting so I opened the magazine to the story and immediately saw some amazing looking rockets. I dove into the article and each paragraph started my mind swirling off into different directions thinking how I could make something that might look as interesting as those in the article.
Rather than start working on a new rocket to create my first steampunk example, I looked at my fleet of tired rockets that I seldom fly anymore. I was drawn to my Big Bertha that I had built many years earlier with a three engine cluster. It was sitting there with a rather ugly plain blue finish. No markings or anything else, just solid plain blue. Yes, this should work, I’ll convert my Big Bertha into Steam-Bertha!
Using the article as inspiration and a guide to begin sourcing the parts I would need, I started getting my materials together. First I got a couple of manila file folders for the heavy paper that I’d need for the straps that the “rivets” would go on. Now for the “rivets”. I went to Michael’s and picked up a sheet of half-round pearls with sticky backing. I’m not sure what other crafters use these for, but for me they were going to become my rivet heads. I also found a few cards of pre-punched cardboard centering rings in my Estes rocket parts stash. Those could be used as portholes. Also in the stash, were some extra launch lugs that I could turn into external piping to disguise the actual launch lug that was already on the rocket.
Next I sanded most of the blue paint off Bertha and then re-primed her with Krylon white ultra-flat primer. This new primer from Krylon is pretty thick and does a good job of filling the spirals and balsa grain. A couple of coats with a bit of sanding in between coats and the spirals and grain nearly vanished.
Now I stood back and decided where the body straps would go. These would simulate the different plates that were riveted together to make the rocket. I took a pencil and started marking lightly on the primer until I had what I thought would look good. I also made some marks as to where I might run some external piping.
To create the straps I cut some strips from the manila folder. They needed to be just a bit wider than my pearl rivet heads. I did need to make sure that I didn’t put any vertical straps in line with the launch lug. I used Elmer’s Wood Glue to attach the strips to the rocket. Once I had those on, I needed to decide what else would go into those blank areas between the straps.
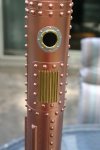
That was where I put the portholes, some external piping, a radiator, a hatch, some odd shapes to look like patches, and some additional straps at a diagonal. I also put some manila folder strips at the fin roots to make them look as though they were riveted to the rocket. The radiator was made from sections of Plastruct “T” beams that were cut to length and then attached within a manila folder frame using superglue made for plastic.
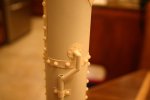
The hatch has a detail made to look like a wheel that would be turned to latch it in place. It was made by using JB Weld to attach a watch gear to a short stub of Plastruct tubing. This was then JB Welded to the hatch at an appropriate location.
Some of the areas needed rivet heads much smaller than my half round pearls. For those I used small dabs of Elmer’s glue applied with a toothpick.
Once most of the major details were added to the rocket, it was time to start adding the rivets. I started with the fin attachment straps. For these I used another kind of button from Michael’s. They are a bit wider and flatter than the pearls. Once those were done, I started on the rest of the straps. Unfortunately the pearls would not come off their backing with any of the sticky left on them. This meant that I was going to have to glue each one individually. I used my Elmer’s Wood Glue for this. It worked pretty well, but I needed to be careful not to put much sideways force on them once the glue set, or they would pop off. Obviously this was not going to work as a permanent solution. I could just see half the pearls popping off on each landing. My solution was to add a drop of thin CA to each one after I had them all on. This works great.
After all the goodies were attached, I needed to primer Bertha again to get a good surface for the paint. Ah yes, the paint. What color? I really wanted a nice brass with a slightly orange tint to it. Apparently no one makes anything like that. At least I couldn’t find any. I decided to go with a Krylon metallic copper. It is a bit too orange but the look is not bad. I sprayed a nice base coat of the copper over the entire rocket. Once that had dried completely (about 2 days later), I started adding accents. I found a very nice Testor’s bright brass color. I used this for various straps, the piping, porthole frames and the main radiator. I also used Testor’s steel for some plates and some detail around the portholes and hatch. Finally, I used black for the porthole glass.
After allowing all the paint to dry for 3 more days, I took a black wash and brushed over the whole rocket to give it that used look and to bring out some of the details.
It has flown and amazingly I did not have to make any repairs to the finish after the flight. Long live Steam-Bertha!
I am so pleased with this one that I am definitely going to do another. I think the next one will be that sad looking Estes Canadian Arrow rocket that is sitting in the corner next to where the old Bertha was.


One thought on “Creating Steam-Bertha”