I’ve been working on a 1/144 shuttle stack of Discovery (STS-31) on and off (mostly off) for the last year or so. I’ve finally made some progress on it. The SRB’s are close, I need to relocate a couple of antennas and then do some hand painting and the decals. The ET is the part that has probably caused this build to sit idle for so long. Getting the colors right and masking is just giving me fits. Eventually I’ll have to tackle it. The orbiter is almost finished. I painted it a few months ago and recently decided that I need to get the decals on it and at least get this part finished.
The decals are a combination of the RealSpace Models decal set, the Warbird Decals sets 14404 and 14405 and some decals that I made myself. The Warbird decals for the topside of the orbiter are pretty good. I used the decals for the nose, the forward RCS, star trackers, bay door hinges, access panels, tail and elevons. I also used the Warbird decals for the wing topside, and the bottom side tiles. I used the RealSpace decals for some of the SRB markings and the orbiter main hatch. I made my own decals for the RCS covers on the sides of the orbiter nose. I used the RealSpace decals for the cockpit windows as a starting point since they are the right shape. I greatly toned down the tile edges since the tile marks are hardly visible at this scale. The upper windows are correct but for the Discovery on the STS-31 mission, there are warning triangles next to both windows. So I made my own for those. Also the shuttles have two vents surrounded by black on the left side of the vehicle and on the right side of the vehicle is a single vent surrounded by black. The RealSpace set has the single vent for the right side, but it has yellow warning signs on it which were not there on STS-31, so I made my own. The Warbird decals for markings between the tail and OAMS pods are correct except they include yellow boxes that are not there on a ready for flight vehicle. Also they include decals for the black tiles on the OAMS pod fronts. But they also show individual tiles which I didn’t want. So again, I made my own in both cases based on the Warbird decals.
Anyway I finally got the decals on and they look pretty good. The Warbird decals seem fairly thick, which is a good thing since some of the decals are very large. Even though they are thick, they react well to Microscale Micro Set and Micro Sol. Between the two of them the decals laid down nicely and really do have the painted on look.
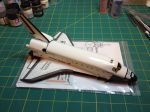
Here are some pictures of the orbiter so far. I say “so far” because I have not yet sprayed on the dullcoat layer and the main engines and OAMS nozzles are not on yet. It has been covered with a coat of Pledge Floor Care (used to be Future Floor Finish a long time ago) hence the very glossy shine. I needed to seal in the decals to protect them from the Tamiya Clear Flat since it specifically states on the can that it can damage decals. I’ll be doing a test shot first to be sure the Pledge will not react with the Tamiya Clear Flat. The photo of the left side is out of focus, I’ll try and update it later.
Once that is done maybe I can get to the SRB’s get them finished and then work up the courage to tackle the ET.