
After running my current PC for 11 years I decided that it was time to build a new computer. The old one was powered by an Intel Core 2 Duo E8600 processor. I had to change the graphics card twice during that time. The current one is an ASUS Radeon RX560 and it works pretty well. The hard drives had been replaced once to upgrade them to 1tb drives. It also survived a couple of hard drive failures. The drives were set up in two RAID 1 arrays, so the drive failures were relatively easy to fix. But this PC had gone from XP to Windows 7 and now Windows 10 so there was a lot of baggage that it was lugging around from those upgrades. Plus the old RAID user interface was not supported on Windows 10. It was time to build a new PC.
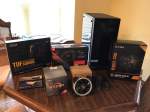
I decided that I’d like the new PC to last at least 5 years if not more so I decided to over build it a bit. The processor would be a Ryzen 5 3600X processor. It has 6 cores and 12 threads so I should have to problem in the compute area. I originally was going to use the Ryzen 5 3600 but there was a sale and the 3600X was the same price as then 3600 so I figured that I might as well get the slightly higher clock of the 3600X. I put in 16GB of memory in two 8GB sticks clocked at 3200MHz.
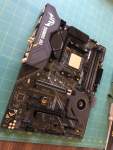
The motherboard was a difficult choice. I really wanted an X570 board but they were all pretty pricey. I thought about an MSI Tomahawk B450 board, but I would probably have to flash the BIOS just to get it running and I didn’t have spare processor around. I was looking at a couple of MSI X570 boards and an ASUS X570 board. I ended up getting the ASUS TUF Gaming X570-Plus (Wi-Fi) board. It went on sale and had most of the features I wanted.
For hard drives I went with the 1TB Western Digital Black SN750 NVMe SSD for my system drive and I pulled one of the 1TB hard drives out of my old PC that had all my data files on it as my storage drive.
I decided that I also wanted a small bit of RGB in this build. For that I got a three pack of Rosewill RGB 120mm case fans that came with a control box and were also compatible with the ASUS Aura system. The downside of the Rosewill fans is that they are not PWM so the motherboard could not control the fan speed. I would have to set their speed with the included remote. The G.Skill Trident Z Neo memory also was RGB.
The power supply is a fully modular EVGA 650 G5 650W 80-Plus Gold. I went with the Fractal Meshify C case. It has great airflow, a glass side panel, easily cleaned filters, a PSU shroud, and room in the back for cable management. It was a bit more that I had originally planed to spend but it is a well reviewed case.
I also stole the Radeon RX560 from my old PC. I will replace it when I save up some for a newer more powerful card.
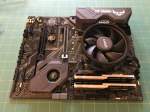
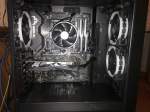
I started the build by installing the CPU and heatsink/Fan. Then I inserted the memory and the NVMe SSD. With that complete I installed it in my case.

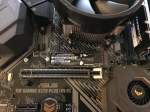

I then installed the PSU and the required power cables. Next I connected the front panel cables to their proper places on the mother board. Then the SATA cable from the data drive. The 3.5 inch hard drive is in a small drive cage at the opposite end of the PSU shroud from the power supply. Then I started hooking up the power to the motherboard. Then the graphics card went in. I also routed the VGA power cable to the graphics card.
The fan cables got routed into the back where they attached to the controller board. Then the control cable got routed to the one and only ARGB header on the motherboard. This would allow the fan RGB to be controlled by the ASUS Aura software. The only problem was that the power cable would not connect to the controller. I could only push it slightly on the pins and then it would stop. I tried several times and it was just not going to happen. I then went and got an old LED from my stash and tried to push one of the legs into the control cable. It would only go in a small way and then stop, like there was some obstruction inside the socket. I looked and looked even under a magnifying glass, but I could not see any obstruction. Finally, I decided to get a straight pin from my wife’s sewing room and see if I could stick that into the hole. Yes, it did go in. I then took the pin and moved it around in a circular pattern to see if that would open the hole up. I then tried putting in into the controller and it went in. It was securely in place and wasn’t too loose.
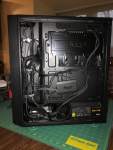
The cable management in the back is a bit messy but at least it can’t be seen. One of these days I’ll learn to properly run cables.
At this point I checked the back panel and noticed that the USB sockets didn’t quite line up with the the openings in the back panel cover. I really missed that one. To fix it I had to remove the rear facing case fan, then disconnect the power cables from the motherboard. Next, disconnect the SATA and the RGB cables and unscrew the motherboard. Then carefully pull the motherboard forward to get it away from the back panel cover. Then carefully put it back into place and this time make sure that the USB sockets cleared the back panel openings. Finally, hook everything back up.
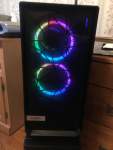
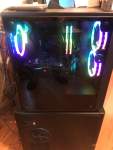
I plugged it in and everything works. I’ve installed Windows 10 Pro and most of my software applications. I can access all my data. So far so good. Below is what it looks like when it is on. I need to play with the Aura software some, but I have lots of time for that.
‘Till next time…
