
I’m starting a new build. This will be the first for the year. Last year I completed three models. That is a record for me. I’ll see if I can do better this year.
First on the table this year is an all resin kit of the Saturn I Block I (SA-1) from Martin’s Models. I purchased this kit directly from Martin in the UK at least 4 years ago. Some people say that the castings are pretty good. I’m not quite in that camp. Maybe over the years his casting process has gotten better. The castings in my kit are not quite up there with New-Ware or RealSpace Models. There are some casting flaws and some parts are a bit out of round, but it should still build up to a nice model. I’ll just have to do more cleaning than usual and do a little scratch building.
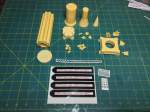
First thing I did was to gather everything together to see what I had to work with. A number of the parts will require some clean up and filling. On some of the parts it is hard to tell where the the pour plug ends and the part itself begins. I also don’t think I’ll be using the included display base. I’ll display it like I’ve been doing with my 1/144 manned launchers. The included decals are not bad, but I might be doing some custom ones before it’s all over.
I cleaned up the parts and removed the pour plugs as best I could tell. Many of the parts will require more work to look good.

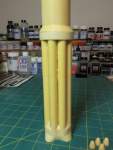
I sanded the bases of the major sections and then started stacking them to see how far off from square I was. It is really difficult to sand them exactly square, so I rotated the parts until I got what looked like a straight rocket from the bottom to the top. I also made some alignment marks so that as I stack them later for gluing I can be sure that the alignment remains in the original orientation.


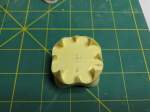
Next, I made some marks on the first stage boat tail. This will allow me to drill a hole in the center for the rod that will hold the model in place on the base. I also made a diagram to assist me when I scribe the lines on the base heat shield.

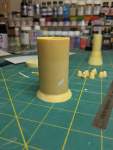
Then I glued the first stage tanks to the boat tail. I had to use a couple of shims to get a vertical stage. I attached them with CA. Then I started the process of filling the areas where the tanks meet the boat tail. This is still a work in progress. You can also see from the pictures that there is some clean up to be done between the tanks as well. I also filled a major divot on the boilerplate second stage.

That’s all for now.
