
I’ve been working on this model for a while since the last update. After the primer went on, many flaws showed up that I couldn’t see on the bare resin. Fixing these required many iterations of putty, sand, primer, and inspect. Sometimes I thought I was getting close only to find some new pinholes show up due to sanding the surface of the resin. Martin really needs to invest in some vacuum casting tools. Anyway I finally got through that stage and was able to start painting. I started out by painting the engine nozzles and turbo pump exhausts with Tamyia bright silver paint. Then I painted the inside of the nozzles and the holes I drilled in the turbo pump exhausts with clear smoke. I then gave the model a coat of gloss white.

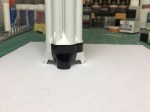
After letting the gloss white cure for a couple of days I started masking for the black areas on the first stage boat tail. The rest of the rocket is white. The boat tail was a challenge to mask due to all the compound curves. I finally got it masked satisfactorily, including the heat shield area on the base.


Next I sprayed gloss black on the base of the rocket. I let the paint dry for a few hours before removing the masking tape. The black areas turned out fine. The black tanks will have some custom decals applied rather than trying to mask them off. The area between the tanks is still a bit rough, but it is MUCH better than it was out of the box.


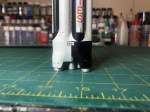
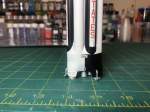
To create the custom decals I started out with a scan of the decals that came in the kit and then photos of the actual vehicle. I resized and modified them to be more accurate. I added stripes that go halfway around the dummy third stage just below the nosecone and at the third stage/transition junction centered on Position I. I also added some inverted “T” shapes that appear on the dummy second stage at the interstage junction. The checkerboard roll pattern that appears around the top of the first stage was not correct at all in the kit decal. I measured the circumference of the area and then using photos counted the number of checkers and drew a new decal. Also there is a slightly larger block that appears at 8 places around the roll pattern and I added those as well. I double printed the white areas of the vehicle number and position number decals to help avoid the black from showing through.

I knew I was in for a challenge in applying the fuel tank decals. There are a number of raised areas that are hard to account for when making the decal. I had to cut the decals in places and use some black paint to touch up a few spots. Micro Set and Micro Sol were used quite a bit in getting the decals to settle over the added details. I also had to double layer the decals that were put on over the black. Even double printing the white while printing the decals was not enough to keep the black from showing through. Applying the second decal over the first eliminated the black showing through. In the end the model looks pretty good.
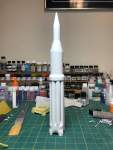
With the decals in place, I let the model dry completely overnight and then sprayed a gloss coat over them to protect them and prepare them for an overall clear flat coat. After the clear coats dried overnight I then added the engine nozzles and turbo pump exhausts with some CA. Finally, the model is done. It looks nice sitting on its stand.

The stand should be temporary since I plan on adding SA-5 and SA-10 to the collection to show the Saturn I progression. However those will have to wait a bit. I need to take a break from the resin before tackling those kits. Thanks for following along. I hope to start the next build shortly, probably a sci-fi subject.
