
Progress continues on the SA-5 model. I made the decision to replace the S-IV that came in the upgrade kit with my own that I would make out of some resin that I already had. This would give me a round S-IV stage that would match the interstage without massive amounts of filler and hours of sanding to get it round.
I started by gluing three rods into the bottom of the interstage part. Next I glued a circle made from .010 sheet stock to the top of the three rods. I applied thick CA to the edges to seal the circle to the inside of the interstage. This would be the bottom of the S-IV mold. I had previously decided that I was going to be displaying this model as a complete stack without separable stages. This allowed me to pour the new S-IV to the top of the interstage. I then glued a section of cardboard tube to the top of the styrene circle to make the walls thinner and lighten the model.
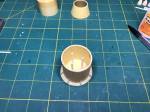
Anyway, I also cut a section of cardboard tube that was 1.5 inches in diameter on the inside, which almost exactly matches the interstage diameter. I glued a strip of styrene to the top of this tube to give me a physical indication of how far to sand down the top when the resin cured. I coated the inside with thin CA glue to seal the cardboard and then gave it a light sanding to remove some of the surface roughness. Next I sprayed the inside with some mold release to hopefully make it easier to remove the tube after casting. I also drew a line on the inside so I would know how far down to push the tube over the interstage to get the correct S-IV length.

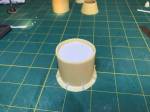
I slid the outer tube over the interstage and then prepared to mix and pour the resin. My resin is getting a bit old and part of the resin was starting to separate out. I stirred it well to get a smooth resin and then measured out equal parts of resin and hardener and mixed them together. I poured it into the mold to just below the top edge of the styrene strip inside the tube. Unfortunately there was still too much air in the resin after I had stirred it up and the cured resin expanded and rose up out of the top of the tube.

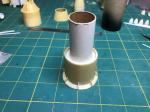
This was not exactly desirable, but I could just cut off the excess and then remove the outer tube and it would be fine. Except that after removing the outer tube, I could see that the extra air caused a bunch of bubble holes that would need filling. Oh well, at least it is round and all I have to do is smooth the outer surface. I sanded the top down to the indention made by the styrene strip and now I had a round S-IV with the proper length.


At this point I decided to add a few details to the interstage. It needed standoffs for the three gaseous hydrogen vent pipes and also needed to have the camera canisters added next to the stub fins at positions 1 through 4.


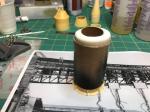
I then sprayed on a first coat of primer. Then glued on the S-IV interstage and sanded the junction with the S-IV body to a more rounded profile.

I sprayed a coat of primer on the S-I stage and did a bit of additional filling and sanding on some of the fins. Next I sprayed on a final coat of primer to complete the S-I stage.


That’s it for now. Much more work to be done on the S-IV stage. Thanks for looking.
