
Time for another update.
I’ve been busy on the Apollo spacecraft section. The Realspace part needed a few updates. The first one I tackled were the panel lines on the Spacecraft Lunar Adapter (SLA). Glen had engraved the lines, but my sources indicated that they were raised lines. They were part of the separation mechanism. The New-Ware update set had some PE parts that could work to update it, but when I checked, I couldn’t be sure that they would fit properly. They would fit better on the Airfix part but that presented its own problems. If I used the Airfix SLA then I’d have to cut off the Command/Service Module (CSM) from the Realspace resin part. I could keep the Airfix Service Module (SM) but then I’d be in a pickle for the Command Module (CM). Both the Airfix and Monogram CMs were wildly undersized, even with the kit Boost Protective Cover (BPC). So, I decided to add my own panel line strips to the resin SLA. I also had to add the semi-circular parts that were between the hinge details. I found that a 1/8 inch hole punch made a circle of styrene sheet that I could modify and make look good enough.

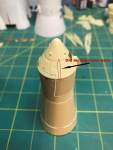
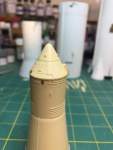
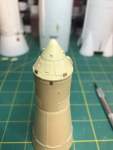
I then got ready to add the PE parts to the spacecraft section. My drawings show that after Apollo 14 there was an extra window in the BPC above the commander’s docking window. I took a small drill and made an appropriate sized hole. I’ll paint both the windows black when it comes time to paint.

I started adding the PE with the CM attitude control thruster covers. After adding the first one under the crew hatch, I went to add the next cover and noticed that where the other two covers needed to go was a reinforcing ridge. I could have just moved the thruster covers over to avoid the detail, but that would have put them obviously offset from the +Y and -Y positions where they were supposed to go. I removed the offending details and used some .4mm strip to place them where they were supposed to be.
Next was to start adding the PE to the SLA. The PE pieces were relatively large so I used a dowel to add a gentle curve to the parts so they would conform to the curve of the resin. One thing I fortunately noticed before I started adding the PE parts was that New-Ware labeled the placement drawing with POS III in the wrong place. I was comparing to my source material and noticed that things were not going to line up. It took me a while to realize that the fix was as simple as just re-labeling the instructions to show POS I where they had POS III. Things went smoothly after that. I’ll add the SM attitude control thrusters after painting is done.


Now all the major sections are ready for their first coat of primer. Then I’ll be able to tell what areas need further attention. I still have to finish the Escape Tower. I’m trying to decide if I want to use the Realspace PE parts or if I want to scratch build one. The escape rocket from Realspace is fine, I won’t need to mess with that. I guess I’ll play with some styrene rods and see how difficult it might be to scratch one.


Things have finally started to warm up. I’ll try to get some primer sprayed now.
