
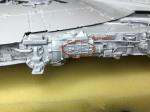
Decaling is finally finished. Over 82 tiny decals beside the 112 panel decals. Yes they are thick. Yes they are difficult to get to conform to the fine details on the model. It does take a lot of Solvaset. It does take using a needle and #11 knife blade and a small bit of paint touch up. But, yes in the end they do look good.
As the underside decals were going on I looked ahead and found three places on the side walls where Bandai provided a decal to cover a section. Those sections have too many fine raised details to attempt to get the decal to conform. For those areas, I mixed up some paint (a mix of Desert Sand and Aged White) that to my eye was a close match for the decal color instead of using the decal.
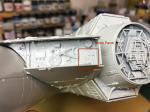
The left side might be workable, but why bother when I already have to paint two other sections.
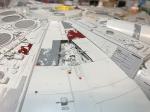
Here are some photos of the lower side completed. The second photo below shows one of the side panels that was painted instead of decals.


Now for the top side decals.


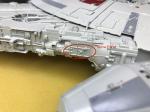
In some areas, especially where the decal needs to cover some small complicated details, it help to apply Solvaset to the area and then apply the decal. When doing this you need to be particularly careful to not work the decal too much since the Solvaset will soften the decal quickly. There is at least one of the panel decals (#94) that was a bit easier to apply by cutting it into separate parts. Decal #94 is the decal that covers the panels next to the antenna mount.
When the decaling was finished, I went back through each call out in the instructions and compared that to the position on the model to be sure that I applied all the decals. One reason I did this was because when I finished I had some extra decals. I wanted to be sure that the extra decals were true extras and not something that I missed. I did find two decals that I had missed in the call outs.
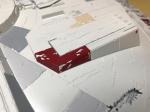
One other thing to note is the antenna decals. I applied them as Bandai specified in the instructions.

But then I noticed that the photos I have of the 5-foot filming miniature didn’t match. It seemed backwards. I then went to a copy of the Episode IV movie and looked for views of the back of the antenna in the film. When I found one it matched the Bandai instructions. Looking carefully it appears that the newer photos of the 5-foot version have the antenna mounted backwards and flipped 180 degrees. I positioned the antenna that way and it did look like the photos of the 5-footer. (Of course you can’t put it on the model that way since the parts are keyed to only fit one way.) So I’d say go ahead and trust Bandai and their research of the ANH Falcon.
Anyway, I’m finally done with the decals and will be moving on to weathering the Falcon. Wish me luck.
Thanks for looking.

Thanks for this write up, great job on this. I am working on one of these as well, so appreciate the advice.
Looking forward to seeing your weathering!