
Back to the Millennium Falcon. I got the Vallejo gloss and dull coat and started out by testing it on a wall of the boarding ramp. It went on fine, maybe a little thick but it did not react with the underlying paint as expected.
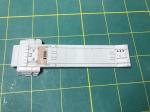
I then took the boarding ramp part and applied the decals after giving it a clear coat. The decals are rather thick as has been mentioned in many places by others. There were some fine details that the decals needed to conform to on the boarding ramp. This required several applications of Solvaset. It really is much stronger that Micro Scale MicroSol. You do not have much time after applying Solvaset to work with the decal before it becomes too soft to touch. I let the Solvaset dry completely between applications and with each application I carefully eased the decal into the details. Even so, some details were just a bit tall or complicated to really get it to snuggle down. For those areas I either made a small slice with a sharp #11 blade or pricked it with a straight pin. Then applied more Solvaset. This seemed to work pretty well and the decals settled in nicely. After they were dry I sprayed them lightly with the Vallejo dull coat. It did not attack the decal. When that had dried I then applied a bit heavier coat to get the flat surface I wanted.
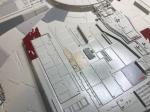
With these tests behind me I moved on to the rest of the model. I took the engine cover and gave it a clear coat and after that had cured I started adding the decals that would go under the engine flaps at the back. While those were being snuggled down with Solvaset, I started adding the decals to the engine flaps. When those were complete I finished the assembly of the engine cover by installing the engine flaps. Then I finished adding decals to the engine cover. It looks good and is just waiting for its dull coat. I’ll do that when I dull coat the rest of the upper hull.

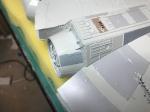
I then put the two hull halves together. I got some foam padding and placed the Falcon upside down on the foam to begin adding decals to the lower hull. When applying the larger decals that color some of the panels, I made sure to trim closely to decal and remove as much of the clear part as possible. Some of the decals were stubborn with the raised details as expected and required some knife work to get settled down properly. In some instances this resulted in some of the base coat showing through the cut. I found that for the yellowish decals a mix of Vallejo Aged White and Desert Armour matched very well. Dark Ghost Gray worked well with the dark gray panels. A mix of German Red Brown and Red was a good match for the red panels.


In the process of finding the colors to match the decals, I first tried some Tamiya medium gray. The color matched fairly well but it did not react well with the clear coat on the test piece at all. My advice is if you start with Vallejo stick with it and don’t use them with any other brand of paint. Better safe than sorry.
I know this might seem like a lot of work rather than just painting the individual panels and then chipping the paint. That is probably true. The only problem here is that I have zero experience with paint chipping and I didn’t think that this would be the right model to learn on. I will take on the chipping process in a future build, but for now the decals are working well even if it is a bit slow.
While working on the decals I did notice that the details I had added to the Turbo Laser stations were more visible than I thought they would be. Hopefully it will still be that way after the Turbo Lasers are added.
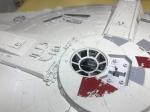
That is it for now. Half of the lower hull is done, maybe in the next week I can finish the decals and can move on to staining/weathering the Falcon.
Thanks for looking.
